DominATE is the basement on which all other JavATE libraries are build. It contains interfaces for the basic patterns of domain driven design like "entity" and "repository". These interfaces gives you the possibility to access these objects in a standardized way allowing a lot of generalization and simplification.
Side by side with these interfaces there are implementations that speed up the development of application using mainstream technologies like Hibernate.
One of the first things you need to be confident with, when you create an object model, is the distinction between entities and values. This distinction is based on the concept of object identity and answers the question: "How do I write the equals() method?".
The most obvious way to answer this question is to write a equals() method that takes each of the object attributes and compares them. But this is not always the right answer.
If you are developing a Date object with "day", "month" and "year" attributes, this is true. Two dates are the same if they have identical day, month and year. But what about a Person object with "fisrtName" and "lastName" attributes? We can have two distinct persons with the same name, or a person could decide to change its name (not common, but possible). For a person we need an external identification mechanism, something that is not part of the person itself, a special attribute. We can call it an "identifier".
Having an object identifier is common, mainly when you persist your objects on a relational database. In this case the identifier is naturally the primary key of the relational table.
To Summarize:
This is all we need right now. Refer to Eric Evans book about Domain Driven Design for a deeper insight into the argument.
DominATE has a special interface for identifying entities. Obviously it is called "Entity", and it has accessor methods for the "id" property. Entity is a parameterized class whose parameter is the type of the "id" property. The only rule for this type is that it must implements Serializable, because some object persistence frameworks requires a Serializable object for the identifiers.
When you implement this interface pay attention to the equals() and hashCode() methods. You have to implement these methods using the id property value only.
If you want you can extend the default implementation of this interface, the EntityImpl class. It implements an Entity with a Long id, the most common case when you persist your objects on a relational database. In this class you have equals() and hashCode() already implemented.
This class implements the OptLockEntity interface too. This interface adds the accessor methods for the "version" property of type Long. This property can be used for optimistic locking purposes in frameworks that supports it, like Hibernate.
For entities persisted on a LDAP directory is not uncommon to use the distinguished name of the entity as the identifier, so EntityImpl cannot be used you have to implement it yourself like
public class LdapEntity implements Entity<String> {
    private String id;

    public String getId() {
        return id;
    }

    public void setId(String id) {
        this.id = id;
    }

    @Override
    public boolean equals(Object o) {
        return o != null
            && o instanceof LdapEntity
            && id.equals(((LdapEntity)o).id);
    }

    @Override
    public int hashCode() {
        return id.hashCode();
    }
}
The natural way for accessing the objects in your model is through association navigation, but you need at least one root access point. These access points are the repositories, a sort of bunch of entities that you can query and/or populate.
In DominATE repositories are objects that implement the Repository interface. It has methods for retrieving its content ( get() and list() ), and to modify its content ( put() and remove() ).
Obviously the repository will use the underlying persistence mechanism that is available to retrieve and save the entities.
A repository takes two type parameters: the first is the class of the entity identifier, the second is the class of the entity itself. So, if MyEntity extends EntityImpl, its repository declaration will be
Repository<Long,MyEntity>
The simplest query method we can use on a repository is the get() method. It takes the identifier of an entity and returns the entity itself.
MyEntity e = myRepository.get(1L);
In e we will have the entity whose identifier is 1.
Another simple query method is list(). It returns all the objects of the repository.
List<MyEntity> l = myRepository.list();
This list can be quite long so we need some way to restrict the number of objects retrieved. This can be done using the setFirst() and setLast() methods. These methods set the index of the first and last object that will be retrieved.
If by default the list() method retrieves 100 objects
myRepository.setFirst(11);
myRepository.setLast(20);
List<MyEntity> l = myRepository.list();
in l we will have 10 obejcts only. The index we use in setFirst() and setLast() is relative to the list retrieved by default and is 0 based (as always in Java).
We are using the index of the list, so the positions are important. To order the list we retrieve we can use the setOrder() method. This method takes two parameters: the name of a property of the entity on which we want to order and a boolean that specify if the order is ascending or descending.
The following code will make the list retrieved with the list() method ordered by the "prop1" property in ascending order:
myRepository.setOrder("prop1",false);
We can filter the list in a very customizable way passing a Specification to the list() method. More on this subject in the chapter about specifications.
If you want to change the content of the repository you can use the put() and remove() methods. The put() method accept an entity and put it in the repository, the remove() method will remove it.
The simplest implementations of the repository interface are part of the in-memory repository family that put their content in Java collections.
Such implementations seem useless as its content is not persisted in any way. But this is not true. Each implementation was developed for a specific use in mind.
The main purpose of MemoryRepository is testing. If a class under test needs a repository, you can create an instance of MemoryRepository and initialize it with testing data. So you will not need to access the real data store to test your class. This is very important especially for complex model classes where you have to concentrate yourself in testing the business logic.
CollectionRepository, instead, was developed as an adapter to present an existing collection with the repository interface.
Suppose you have a class (like the ApplicATE ListBrowser) that takes a repository. If you want to pass a collection to it you need and adapter, so create a CollectionRepository passing the collection to its constructor.
A similar purpose has the EmptyRepository. As its name suggest it is a repository without content. If a class needs a repository but you have no content to be accessed you can pass an EmptyRepository to it.
As their name suggests Hibernate repositories are used to access entities that are persisted on a relational database using Hibernate.
There are two implementations:
ClassHibernate repository is the most important of the two. It gives you access to all the entities of a specified class. The class must be passed to the repository constructor:
Repository<Long,MyEntity> rep = new ClassHibernateRepository<Long,MyEntity>(MyEntity.class);
The repository will use the Hibernate Session interface to do its work.
CollectionHibernateRepository, instead, is a wrapper around a persistent collection and use Hibernate filter to query against this collection:
MyEntity e = rep.get(1L);
Repository<Long,YourEntity> collRep = new CollectionHibernateRepository<Long,YourEntity>(e.getYourCollection());
The main difficulty in using Hibernate repositories is understanding how they retrieve the Hibernate session they need to perform their job.
The repositories get their sessions using a HibernateSessionManager, a class that manage the life-cycle of a session. There are two possible life-cycles:
The life-cycle must be specified in the constructor of the session manager.
The first time the getSession() method will be called a new session is created. In each subsequent call to getSession() in the same thread, the same session will be returned.
The difference between the two life-cycles is in session destruction. When the static disconnectAll() method is called a loop on all the open sessions will be performed but, while thread-local sessions are closed, long-running sessions are simply disconnected.
In this way long-running sessions can be re-opened when the getSession() method is called again on the same session manager while thread local sessions, being completely closed, need to be recreated.
To completely close a long-running session you can use the release() method.
Consider the following typical use case:
HibernateSessionManager sMgr = new HibernateSessionManager(.......);
Session s = sMgr.getSession();
/* Use the session here */
HibernateSessionManager.disconnectAll();

Session s = sMgr.getSession();
/* Use the session here */
HibernateSessionManager.disconnectAll();

sMgr.release();
If, in the first row, LONG_RUNNING is passed to the constructor, the two blocks will use the same session. If, otherwise, THREAD_LOCAL is used, the two blocks will use different sessions.
A session manager should not be used after it has been released.
Repositories don't create session managers by their own, instead they retrieve them from a SessionManagerRegistry, a singleton that manage a stack of session managers for each thread.
Calling currentSessionManager() on the registry will retrieve the session manager on the top of the stack. If the stack is empty a new session manager with thread-local life-cycle is created.
You can put a session manager on the stack using the useSessionManager() method and with releaseSessionManager() the session manager on the top of the stack is removed.
So to use a Hibernate repository with a thread local life-cycle session you can simply do the following:
Repository<Long,MyEntity> rep = new ClassHibernateRepository<Long,MyEntity>(MyEntity.class);
/* use the repository here */
HibernateSessionManager.disconnectAll();
while for long running sessions
HibernateSessionManager sMgr = new HibernateSessionManager(LONG_RUNNING);

Repository<Long,MyEntity> rep = new ClassHibernateRepository<Long,MyEntity>(MyEntity.class);
SessionManagerRegistry.useSessionManager(sMgr);
/* use the repository here */
SessionManagerRegistry.releaseSessionManager();
HibernateSessionManager.disconnectAll();

SessionManagerRegistry.useSessionManager(sMgr);
/* use the repository here */
SessionManagerRegistry.releaseSessionManager();
HibernateSessionManager.disconnectAll();

sMgr.release();
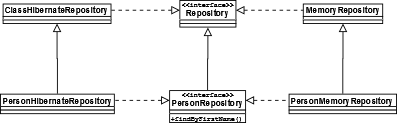
In certain cases you need to extend your repository and add new methods. This is true mainly for specialized query methods that could add expressivity to the code. For example to a Person repository you would add a findByFirstName() method.
Typically these methods can be constructed using basic methods from the repository interface. For example the previously mentioned findByFirstName() query method can be implemented using a specification and the list() method.
But to do this you need to extend a concrete repository like ClassHibernateRepository. And if you need two of these repositories (for example, one hibernate repository for production and one memory repository for test purposes) you need to create two classes replicating these methods. The result can be similar to the following:
This is problematic for various reasons. Not least a clear violation of the DRY (Don't Repeat Yourself) principle.
A better solution involves the use of the Bridge pattern like in this article.
To simplify the implementation of this pattern you can use the AbstractRepositoryBridge class. Implement you repository extending this class. You can add your methods and call the other Repository methods in them.
Then, when you instantiate your repository, you can pass the base repository to the constructor. The AbstractRepositoryBridge class will delegate to this base repository.
So, in our person repository example, we can do something like:
public class PersonRepository extends AbstractRepositoryBridge<Long,Person> {

        public PersonRepository(Repository<Long,Person> bridged) {
        super(bridged);
        }

        public List<Person> findByFirstName(String firstName) {
        PersonSpecification spec = new StringSpecification<Person>("firstName");
        spec.setValue(firstName);
        spec.setComparisonType(ComparisonType.EXACT);
        return list(spec);
        }

}
and the, when we need a person repository, we can do
PersonRepository rep = new PersonRepository(new ClassHibernateRepository(Person.class));
if we need an Hibernate based repository, or
PersonRepository rep = new PersonRepository(new MemoryRepository());
if we need an in-memory repository.
This can be done in repository factory, like described in the following chapter.
The best way to retrieve a repository for the entities of a given class is using the RepositoryRegistry singleton:
Repository<Long,MyEntity> r = RepositoryRegistry.instance().getRepository(MyEntity.class);
But before using it you have to set the repository factory class that the registry will use to create repositories instances:
RepositoryRegistry.instance().setRepositoryFactoryClass(MyRepositoryFactory.class);
This class must implement RepositoryFactory, an interface with a two methods:
Instead of implementing this interface you can extend AbstractRepositoryFactory. This class has a default implementation for the class repository factory method. It tries to find a custom factory method, if it doesn't find this method it will call getDefaultRepository(), an abstract method that you have to implement. The custom factory method for a repository of class MyClass must be called getMyClassRepository().
For example, if you want to customize the way the repository for class MyEntity is instantiated you can do the following:
public class MyRepositoryFactory extends HibernateRepositoryFactory {

    public Repository<Long, MyEntity> getMyEntityRepository() {
        MyRepository<Long, MyEntity> r = new MyRepository<Long, MyEntity>();
        return r;
    }

    public <I extends Serializable,T extends Entity<I>> Repository<I, T> getDefaultRepository(Class<T> c) {
        // create and return the default repository
    }

    public <I extends Serializable,T extends Entity<I>> Repository<I, T> getRepository(Collection<T> c) {
        // create and return the collection repository
    }

}
For Hibernate repositories exists HibernateRepositoryFactory that return a standard ClassHibernateRepository if the given entity class is mapped with Hibernate, otherwise it returns null.
HibernateRepositoryFactory extends AbstractRepositoryFactory so you can customize the way a repository is created implementing a custom factory method.
For example, if you want to customize the way the repository for class MyEntity is instantiated you can do the following:
public class MyRepositoryFactory extends HibernateRepositoryFactory {

    public Repository<Long, MyEntity> getMyEntityRepository() {
        ClassHibernateRepository<Long, MyEntity> r = new ClassHibernateRepository<Long, MyEntity>();
        // do here all your repository customization
        return r;
    }

}
Now, if you do:
  RepositoryRegistry.instance().setRepositoryFactoryClass(MyRepositoryFactory.class);

  Repository<Long, MyEntity> rep = RepositoryRegistry.instance().getRepository(MyEntity.class);
you will get your customized repository.
Strictly speaking a specification is an object that encapsulate the checking of a boolean condition on another object.
You can find a detailed description of the specification pattern in this article by Eric Evans and Martin Fowler.
The Specification interface has a method called isSatisfiedBy() that do exactly this.
Suppose you have a an object that implements Specification and that check if a person is married you can check if John is married with something like this:
    if (isMarried.isSatisfiedBy(john)) {
        .............
    }
But you can use specifications with repositories too. To retrieve from a repository all the entities that satisfies a specification do the following:
repos.list(spec);
To perform its job the repository will use the other two methods of the Specification interface:
The Assembler we talked about is a builder for a query object that the repository can use. Hibernate repositories will use assemblers that build a HQL query or a criteria query while memory repositories will use assemblers that build an Apache Commons Collections Predicate.
If you develop your own repository probably you should develop an Assembler for it and the specifications that you will pass to this repository should support this assembler.
DominATE provides a set of specification classes that can be used in most common cases. For example an instance of StringSpecification can be used to check if a string property of an object is similar to a given string.
 StringSpecification<Person> s = StringSpecification.newInstance("firstName");
 s.setValue("John");
 if (s.isSatisfiedBy(person)) {
     ..........................
 }
All the provided specifications supports both memory and hibernate repositories. To ensure this compatibility you always need to create them using the newInstance() static factory method.
An instance of StringSpecification can be used to check if a string property of an object is similar to a given string.
When you create the specification you have to provide the name of the property you want to check, then you can set the string to compare using the setValue() method. After this, the specification is ready to be used, for example using the isSatisfied() method:
 StringSpecification<Person> s = StringSpecification.newInstance("firstName");
 s.setValue("John");
 if (s.isSatisfiedBy(person)) {
     ..........................
 }
If you do not set a value or the value is null the specification is always satisfied.
The default behavior is to check if the property value starts with the given string, but you can change it using the setComparisonType() method:
 StringSpecification<Person> s = StringSpecification.newInstance("firstName");
 s.setValue("John");
 s.setComparisonType(ComparisonType.EXACT);
 if (s.isSatisfiedBy(person)) {
     ..........................
 }
The possible values are:
An instance of LongSpecification can be used to check if a long property of an object is equal to a given number.
When you create the specification you have to provide the name of the property you want to check, then you can set the number to compare using the setValue() method.
 LongSpecification<Person> s = LongSpecification.newInstance("age");
 s.setValue(30L);
 if (s.isSatisfiedBy(person)) {
     ..........................
 }
If you do not set a value or the value is null the specification is always satisfied.
You can create specification composites aggregating a set of specifications into a single one. Specification composition can be performed using conjunction ( AND ) or disjunction ( OR ).
This is reflected into two distinct classes:
both derived from CompositeSpecification.
These classes has an addSpecification() method that can be used to add specifications to the composite.
So to check both the first name and the last name of a person you can do the following:
StringSpecification<Person> firstNameSpec = StringSpecification.newInstance("firstName");
firstNameSpec.setValue("Andrea");

StringSpecification<Person> lastNameSpec = StringSpecification.newInstance("lastName");
lastNameSpec.setValue("Mattioli");

ConjunctionSpecification<Person> spec = new ConjunctionSpecification<Person>();
spec.addSpecification(firstNameSpec);
spec.addSpecification(lastNameSpec);
Obviously you can add specification composites to other composites so to create very complex conditions.
Why may you need a custom specification? There are two main reasons:
We saw in the previous chapter that the first point can be accomplished using a specification composite. But creating every time a new composite from scratch can be boring and really error prone. To solve this problem we can create a custom specification.
So the first/last name example of the previous chapter can be rewritten like this:
public class PersonSpecification extends ConjunctionSpecification<Person> {
    private StringSpecification<Person> firstNameSpec = StringSpecification.newInstance("firstName");
    private StringSpecification<Person> lastNameSpec = StringSpecification.newInstance("lastName");

    public PersonSpecification() {
        addSpecification(firstNameSpec);
        addSpecification(lastNameSpec);
    }

    public String getFirstName() {
        return firstNameSpec.getValue();
    }

    public void setFirstName(String value) {
        firstNameSpec.setValue(value);
    }

    public String getLastName() {
        return lastNameSpec.getValue();
    }

    public void setLastName(String value) {
        lastNameSpec.setValue(value);
    }
}
In this way we completely encapsulated the string specifications so the users of our PersonSpecification only have to set the first/last name and check it as any other specification.
There are situations where makes sense accessing entities grouped in some way.
For example we could group persons by birth year.
In these cases we can use the EntityGroup class. Objects of this class represents groups of entities that share the fact of satisfying a specification.
We can construct a group in two ways:
Classes that needs a set of group will usually accept an instance of EntityGroupFactory, an interface whose createGroups() method must return a list of entity groups.
You can create your own implementations of EntityGroupFactory but there is an implementation for a very common use case: grouping entities by the value of a property.
In this case we can use the GroupingFactory class. Pass to the constructor a list of entities and the name of a property. When you call the createGoups() method you will have a one group for each value of the property and every group will contain only the entities that has that value for the property.
Validation in DominATE can be done in two different ways: you can use Hibernate Validator annotations or you can implement custom validation methods in your model classes.
An example of using annotations is the following:
    public class Person {
        private String name;
        private String surname;

        @NotNull
        @Length(max=20)
        public String getName() {
            return name;
        }

        public void setName(String name) {
            this.name = name;
        }

        @NotNull
        @Length(max=20)
        public String getSurname() {
            return surname;
        }

        public void setSurname(String surname) {
            this.surname = surname;
        }
    }
The same using validation methods:
    public class Person {
        private String name;
        private String surname;

        public String getName() {
            return name;
        }

        public void setName(String name) {
            this.name = name;
        }

        public ValidationResult validateName(String name) {
            if (name == null) {
                return new ValidationResult(INVALID, "Name cannot be null");
            }
            if (name.length() > 20) {
                return new ValidationResult(INVALID, "Name is too long");
            }
            return new ValidationResult(VALID, null);
        }

        public String getSurname() {
            return surname;
        }

        public void setSurname(String surname) {
            this.surname = surname;
        }

        public ValidationResult validateSurname(String name) {
            if (name == null) {
                return new ValidationResult(INVALID, "Surname cannot be null");
            }
            if (name.length() > 20) {
                return new ValidationResult(INVALID, "Surname is too long");
            }
            return new ValidationResult(VALID, null);
        }
    }
Both methods have their pros and cons that will be described in the following sections.
The clients that need to do validation can abstract themselves from the actual method used using a Validator implementation.
DominATE has a Validator implementation called DefaultValidator.
Validator is an interface with four methods: two are used to perform validation while the other two are used to retrieve validation meta-data.
A Validator implementation should be constructed passing in the object to be validated.
The validateProperty() method is used to perform property validation. Pass it the name of the property and the value to be checked, the validator will return an object of ValidationResult class.
You can check the "type" property of the returned object: if it is INVALID the validation did not pass and the "message" property should contain the error message.
An object should always be in a valid state so invalid values should not be set in a property. So the right use case for a client that wants to set an object property should be something like:
    Validator v = new DefaultValidator(myObject);
    ValidationResult vr = v.validateProperty("myProperty", newValue);
    if (vr.getType().equals(ValidationResult.ResultType.VALID)) {
        myObject.setMyProperty(newValue);
    }
Obviously the client should do this only if it is not sure if the value to be set is valid or not, for example if the value has been typed by a user.
If you want be sure that your object is never in an invalid state you can check it in the setter method, for example:
    public void setMyProperty(String newValue) {
        Validator v = new DefaultValidator(this);
        ValidationResult vr = v.validateProperty("myProperty", newValue);
        if (!vr.getType().equals(ValidationResult.ResultType.VALID)) {
            throw new InvalidArgumentException();
        }
        this.myProperty = newValue;
    }
If a property does not contain a value object but an object with a state that can change (i.e. entities or stateful service objects) this is not sufficient. In fact other objects can have a reference to the same object and change its state. To be sure that the state of an association is valid before proceeding with an operation you can pass the current value of the property to the validateProperty method:
ValidationResult vr = v.validateProperty("myProperty", myObject.getMyProperty());
Even if single properties are valid there can be cases where the object as a whole can still be invalid. These cases appears mostly when users edit objects directly by setting their properties.
In these cases the client can use the validateBean() method to check object validity.
The mechanism is similar to the validateProperty() method: the ValidatorResult returned value is of type VALID if the object is valid, otherwise INVALID.
Clients could need informations about which validations are performed to simplify its work. For example, a user interface could check if a String property has a constraint on length to directly limit the number of characters the user can type.
To retrieve validation meta-data the Validator interface has two methods:
The first method takes the property name as a parameter and returns a collection of Constraint objects. Each constraint has an identifying name and a set of parameters. For example, a constraint implemented using Hibernate Validator annotations will have the name of the annotation as its name, and the annotation parameters as its parameters.
The second method allows to retrieve a single constraint given the name of the property and the name of the constraint.
Using Hibernate Validator is surely the simplest way to attach validation constraints to an object. At this moment only the legacy Hibernate Validator is supported (Version 3.x.x). Version 4 with JSR 303 support will be included when it will be GA.
With Hibernate Validator constraints are attached to objects using annotations. In the following example
    public class Person {
        private String name;
        private String surname;

        @NotNull
        @Length(max=20)
        public String getName() {
            return name;
        }

        public void setName(String name) {
            this.name = name;
        }

        @NotNull
        @Length(max=20)
        public String getSurname() {
            return surname;
        }

        public void setSurname(String surname) {
            this.surname = surname;
        }
    }
the "name" and "surname" properties of the person class are constrained to be both not-null and with maximum length of 20 characters.
Check Hibernate Validator site for details about available annotations and on how to define your own constraint annotations.
