We want to develop a little example web application using Hibernate and ZK. All the application will do is to let the user browse through a list of persons and let him create a new one and edit existing ones.
The domain model is left very very simple to let the reader understand the basic principles of the framework. In the Advance Example you will find a (little bit) more complicated domain.
Some (basic) knowledge of Hibernate and ZK is required to follow this example.
If you want you can download the example source code from here
If you are a Maven user you can simply put a dependency in your pom.xml with something like:
<dependency>
    <groupId>it.amattioli</groupId>
    <artifactId>dominate</artifactId>
    <version>0.5</version>
</dependency>

<dependency>
    <groupId>it.amattioli</groupId>
    <artifactId>applicate</artifactId>
    <version>0.5</version>
</dependency>

<dependency>
    <groupId>it.amattioli</groupId>
    <artifactId>guidate</artifactId>
    <version>0.5</version>
</dependency>
In the central Maven repository there are all the JavATE projects jars and an archetype for a Hibernate and ZK project. So to create the skeleton of your project you can use the following line in your command shell:
mvn archetype:create -DarchetypeGroupId=it.amattioli.archetypes -DarchetypeArtifactId=javate-zk-archetype -DarchetypeVersion=0.7 -DgroupId=mygroup -DartifactId=myartifact
The project skeleton that is created follows the Maven style so Java sources will be in src/main/java , while web resources (like html and ZK zul pages) will be in src/main/webapp
In src/main/webapp/WEB-INF/web.xml is defined a datasource reference called javateApplicationDb. Feel free to change it to whatever you want but don't forget to change it in src/main/resources/hibernate.cfg.xml too.
If you are not a Maven user you can download the full JavATE package from here . In it you will find all the JavATE projects jar and pom.xml files. You can find each project dependencies in the pom.xml.
Our Model is very simple. It consists of a single class only. We will call it "Person" and it will have "firstName" and "lastName" properties. The code will be something like this:
package it.amattioli.example1;

import it.amattioli.dominate.EntityImpl;
import it.amattioli.dominate.Repository;
import it.amattioli.dominate.RepositoryRegistry;

public class Person extends EntityImpl {
        private String firstName;
        private String lastName;

        public String getFirstName() {
                return firstName;
        }

        public void setFirstName(String firstName) {
                this.firstName = firstName;
        }

        public String getLastName() {
                return lastName;
        }

        public void setLastName(String lastName) {
                this.lastName = lastName;
        }

        public static Repository<Long, Person> repository() {
                return RepositoryRegistry.instance().getRepository(Person.class);
        }
}
The Person class is an entity that extends the EntityImpl class so to inherit id and and version properties. Read the Dominate User Guide for details about entities.
Here we added a strange static method. It needs to retrieve a repository for objects of this class.
A repository is a sort of container for objects. As Person class objects will be persisted on a relational database, every time you put an object in the repository it will be saved on the database, and every time you retrieve an object from the repository it will be get from the database.
For objects persisted with Hibernate you don't need to develop a special repository class, Dominate already has one. All you have to do is to specify HibernateRepositoryFactory as your repository factory class. This can be done using setRepositoryFactoryClass() method of RepositoryRegistry class, but we will do it later using a configuration file.
The presence of a repository() method in an entity class is not mandatory. You can always retrieve a repository using the RepositoryRegistry singleton, but I've found that having such a method help you writing clearer code.
You can find more details about repositories in the DominATE User Guide
The Person class will be persisted on the PERSON relational table. The SQL script to create this table depends on the database you are using but will be similar to:
CREATE TABLE PERSON (
        ID INTEGER(10) PRIMARY KEY,
        VERSION INTEGER(10),
        FIRSTNAME VARCHAR(100),
        LASTNAME VARCHAR(100)
)
The hibernate mapping of the Person class onto the PERSON table will be:
<?xml version="1.0" encoding="UTF-8"?>

<!DOCTYPE hibernate-mapping PUBLIC
        "-//Hibernate/Hibernate Mapping DTD 3.0//EN"
        "http://hibernate.sourceforge.net/hibernate-mapping-3.0.dtd">

<hibernate-mapping default-access="field">

  <class name="it.amattioli.example1.Person" table="person">

    <id name="id" type="java.lang.Long">
      <generator class="native"/>
    </id>

    <version name="version"
             type="java.lang.Long"/>

    <property name="firstName"/>

    <property name="lastName"/>

  </class>

</hibernate-mapping>
Don't forget to reference this mapping file in your hibernate.cfg.xml
If you want to know how to unit test your object model look at this .
Our object model is ready, it's time to use it in a real application!
First, we want to give the user the possibility to browse through a list of Person objects. To do this we can use an implementation of the ListBrowser interface. We can develop our implementation but, most of the times, we can use the default implementation ListBrowserImpl. Applicate User Guide has details about ListBrowser and other services.
So, the only thing we have to do is to create a ServiceFactory, a class that applicate will use to create our service objects. This class will have a factory method for each service we need. Now the only service we need is a Person browser:
package it.amattioli.example1;

import it.amattioli.applicate.browsing.ListBrowser;
import it.amattioli.applicate.browsing.ListBrowserImpl;
import it.amattioli.applicate.sessions.AbstractServiceFactory;

public class ExampleServiceFactory extends AbstractServiceFactory {

        public ListBrowser<Long, Person> createPersonBrowser() {
                return new ListBrowserImpl<Long, Person>(Person.repository());
        }

}
The browser needs to know where to retrieve Person objects, so we pass it the Person repository.
In order to make GuidATE ZK connector work we have to configure some ZK listener, so in WEB-INF/zk.xml add the following:
<listener>
        <listener-class>it.amattioli.guidate.init.ApplicationInit</listener-class>
</listener>

<listener>
        <listener-class>it.amattioli.guidate.init.DesktopInitAndCleanup</listener-class>
</listener>

<listener>
        <listener-class>it.amattioli.guidate.init.PageInit</listener-class>
</listener>

<listener>
        <listener-class>it.amattioli.guidate.init.EventCleanup</listener-class>
</listener>
If you created the project skeleton using maven and the javate-zk-archetype you already have this file.
These listeners read a property file called config.properties that has to be in it.amattioli.guidate.config package.
it.amattioli.guidate.repositoryFactoryClass = it.amattioli.dominate.hibernate.HibernateRepositoryFactory
it.amattioli.guidate.applicateSessionClass = it.amattioli.applicate.sessions.ApplicateSession
it.amattioli.guidate.serviceFactoryClass = it.amattioli.example1.ExampleServiceFactory
it.amattioli.guidate.applicateSessionVariable = applicateSession
Once again if you created the project skeleton using maven and the javate-zk-archetype you already have this file, but you have to change the serviceFactoryClass property.
The ApplicationInit listener configure the repositoryFactoryClass so Dominate knows how to create repositories needed to persist objects. We are using Hibernate and we need no special repositories so the default HibernateRepositoryFactory implementation is what we need.
The DesktopInitAndCleanup use applicateSessionClass and serviceFactoryClass properties to create a session for the desktop. A session object will be saved as a desktop attribute and can be used to create services. Other, more complex, uses of session objects will be explained in other examples.
The PageInit listener saves the session object created by DesktopInitAndCleanup in a page variable with the name you specify in the applicateSessionVariable property.
The EventCleanup listener will close the database connections opened during event elaborations.
Now we need a zul page to show the Person list:
    <window title="Person Browser"
            border="normal"
            width="300px"
            apply="it.amattioli.guidate.containers.BackBeanComposer">

        <custom-attributes backBean="personBrowser"/>

        <listbox rows="5" width="99%"
                 apply="it.amattioli.guidate.browsing.BrowserListboxComposer">
            <listhead>
                <listheader label="First Name"
                            width="25%"
                            apply="it.amattioli.guidate.browsing.BrowserListheaderComposer"/>
                <listheader label="Last Name"
                            width="25%"
                            apply="it.amattioli.guidate.browsing.BrowserListheaderComposer"/>
            </listhead>
            <listitem apply="it.amattioli.guidate.collections.PrototypeComposer">
                <listcell apply="it.amattioli.guidate.properties.LabelCellComposer">
                    <custom-attributes propertyName="firstName"/>
                </listcell>
                <listcell apply="it.amattioli.guidate.properties.LabelCellComposer">
                    <custom-attributes propertyName="lastName"/>
                </listcell>
            </listitem>
        </listbox>
    </window>
The enclosing window is the main view of our browser. To let it hold an object we applied it a BackBeanComposer and specified the bean using the backBean custom attribute. In this attribute you can put the real backbean object or a string that can be used to retrieve it from the service factory. In our service factory we have a createPersonBrowser() factory method so here we indicate "personBrowser" as the service name.
We applied other Guidate composers to the listbox, listheaders and lstcells. Notice the propertyName custom attribute assigned to listcells. It is used to indicate which property of every single object in the browser will be put in the cell.
Applicating composers directly to ZK items is the most flexible way to develop a page and allow you to use ZK Studio, but the syntax is a bit lengthy. We developed a set of custom ZK components to simplify the syntax, and the following is the same page using these components:
<window title="Person Browser"
        border="normal"
        width="300px"
        apply="it.amattioli.guidate.containers.BackBeanComposer">

    <custom-attributes backBean="personBrowser"/>

    <browserListbox rows="5" width="99%">
        <listhead>
            <browserListheader label="First Name" width="25%"/>
            <browserListheader label="Last Name"  width="25%"/>
        </listhead>
        <listitemPrototype>
            <labelListcell propertyName="firstName"/>
            <labelListcell propertyName="lastName"/>
        </listitemPrototype>
    </browserListbox>
</window>
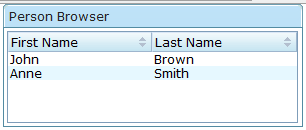
Our first version of the application is ready, you can fill the database PERSON table with some data and launch the application.
You should obtain something similar to
Now we want to expand our application giving the user the ability to create new persons.
To create a new Person object we will make use of a Command, an object that encapsulate an operation. In particular we will use a special case of Command, called an Editor. An Editor is a Command that we can use when all we want to do is to take an object and modify its properties.
For a so common and so simple operation we don't need to develop a custom Command class, we will use a default implementation. All we have to do is to create the factory method in ExampleServiceFactory:
public HibernateEntityEditor<Long,Person> createPersonEditor() {
        HibernateEntityEditor<Long,Person> editor = new HibernateEntityEditor<Long,Person>(Person.class);
        editor = TransactionalCommandContext.newTransaction(editor);
        return editor;
}
This method create a new instance of HibernateEntityEditor, passing it the class of the object it has to edit, then it transform the command in a transaction before returning it. This last row needs a little explanation!
Applicate uses object scoped transactions, that is a transaction is started when a command is instantiated (well, actually when it is transformed in a transaction), and the transaction is closed when the command is executed. Everything method of the command you call lives in the same transaction. The second row of the factory method do this magic, it wraps the command so that every time you call one of its methods the hibernate repositories will always use the same session (and transaction) to retrieve and save objects in the database. This thing is very important for object relations editing and we will see it in action in a subsequent example.
Now all we need to remember is that this is the Applicate way to declare that a command is a transaction.
The other thing we need to create a new person is the personEditor.zul page:
    <window title="Person Editor"
            border="normal"
            width="300px"
            apply="it.amattioli.guidate.containers.CommandComposer">

            <custom-attributes backBean="personEditor"/>

        <hbox widths="50%,50%">
            <label value="First Name:"/>
            <textbox id="firstName"
                     apply="it.amattioli.guidate.properties.TextPropertyComposer"/>
        </hbox>

        <hbox widths="50%,50%">
            <label value="Last Name:"/>
            <textbox id="lastName"
                     apply="it.amattioli.guidate.properties.TextPropertyComposer"/>
        </hbox>

        <hbox>
            <button label="Ok" width="70px" forward="onDoCommand"/>
            <button label="Cancel" width="70px" forward="onCancelCommand"/>
        </hbox>
    </window>
This time we applied a CommandComposer to the window. Its "backBean" custom attribute defines the service that the window will use. We called the command factory method "createPersonEditor" so the name of the service will be "personEditor".
Inside this window we have two text boxes that represents the two properties of a person that we want to edit, "Ok" and "Cancel" buttons.
To the text boxes we apply special composers that bind them to the editor. In simple case like this we can let the composers guess the name of the property from the text box id.
The following is the same zul page developed with custom-components:
    <window title="Person Editor"
            border="normal"
            width="300px"
            apply="it.amattioli.guidate.containers.CommandComposer">

            <custom-attributes backBean="personEditor"/>

        <hbox widths="50%,50%">
            <label value="First Name:"/>
            <textProperty propertyName="firstName"/>
        </hbox>

        <hbox widths="50%,50%">
            <label value="Last Name:"/>
            <textProperty propertyName="lastName"/>
        </hbox>

        <hbox>
            <button label="Ok" width="70px" forward="onDoCommand"/>
            <button label="Cancel" width="70px" forward="onCancelCommand"/>
        </hbox>
    </window>
What we obtained should be similar to this:
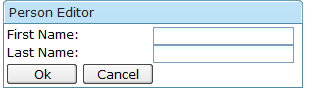
When we press the Ok button, an "onDoCommand" event is forwarded to the editor window, so the command is executed and the window closed.
At this point you can try it yourself. Point your browser to personEditor.zul, fill the text boxes and press Ok. The window will close. Now point to personBrowser.zul and you will see your newly created person.
Obviously in a Rich Internet Application we don't want the user continously switch between this two pages, so let's add a button in the browser page to call the command window. We can do it with a toolbar inside the browsing window:
<toolbar>
    <toolbarbutton label="New Person"
                   apply="it.amattioli.example1.NewPersonBtnComposer"/>
</toolbar>
The button composer will be:
package it.amattioli.example1;

import org.zkoss.zk.ui.Executions;
import org.zkoss.zk.ui.util.GenericAutowireComposer;
import org.zkoss.zul.Window;

public class NewPersonBtnComposer extends GenericAutowireComposer {

    public void onClick() throws Exception {
        Window win = (Window)Executions.createComponents("personEditor.zul", null, null);
        win.doModal();
    }

}
If you try the application, the "New Person" window will open correctly, but if you try to press the Ok button you will get an error! That's because the services you create using the session object talks to each other exchanging messages. When the command is done the browser receive a message so it knows it has to refresh itself. But, when this happens, the browser thinks to be in the command transactional context and the transaction was closed! So the error.
What we have to do is to give the browser its own context, so it will use this context and not the command one. This can be done changing a bit its factory method:
public ListBrowser<Long, Person> createPersonBrowser() {
    ListBrowserImpl<Long, Person> browser = new ListBrowserImpl<Long, Person>(Person.repository());
    browser = ThreadLocalContext.newThreadLocalService(browser);
    return browser;
}
Decorating the browser with a ThreadLocalContext, every time one of the browser method will be called a context will be set so that the browser can use its own Hibernate Session object. This session will remain the same during the thread execution and will be closed when the thread terminates. Usually, for a browser, we don't need long running Hibernate Session.
Now the application should work. We can press the "New Person" button, fill the pop-up fields and press the Ok button. After this the browsing window is automatically refresh and will contain the newly created person.
This is an image of the result:

Lots of frameworks put validation in the user interface layer but this is not an effective approach.
Validation is clearly a business logic responsibility. If you have more than one interface to your business logic you shouldn't have to replicate your validation code.
With JavATE you can put validation code in your business logic in various ways, but the simplest one is to use Hibernate Validator . For example, if you want to check that first name and last name are always entered, you can annotate the Person class properties like this:
@NotEmpty
public String getFirstName() {
    return firstName;
}

@NotEmpty
public String getLastName() {
    return lastName;
}
Doing this causes the user interface to trigger validation of the fields when the user leave the field and to show a message if it fails. To be sure that the user will not be able to execute the command if validation fails just add the following composer to the command window:
    <window title="Person Editor"
            border="normal"
            width="300px"
            apply="it.amattioli.guidate.containers.CommandComposer,
                   it.amattioli.guidate.validators.ValidatingComposer">
The @Length Hibernate Validator annotation has a special role. If you use it like here
@NotEmpty @Length(max=20)
public String getFirstName() {
    return firstName;
}
the maxlength property of the textbox will be set, so the user will not be able to type more characters than what you specified in the annotation.
When the persons in your list become too much, you will want to filter them. You can do it using the Specification pattern.
Create a specification object for your persons:
package it.amattioli.example1;

import it.amattioli.dominate.specifications.ConjunctionSpecification;
import it.amattioli.dominate.specifications.StringSpecification;

public class PersonSpecification extends ConjunctionSpecification<Person> {
    private StringSpecification<Person> firstName = StringSpecification.newInstance("firstName");
    private StringSpecification<Person> lastName = StringSpecification.newInstance("lastName");

    public PersonSpecification() {
        addSpecification(firstName);
        addSpecification(lastName);
    }

    public String getFirstName() {
        return firstName.getValue();
    }

    public void setFirstName(String value) {
        String old = getFirstName();
        firstName.setValue(value);
        firePropertyChange("firstName", old, firstName);
    }

    public String getLastName() {
        return lastName.getValue();
    }

    public void setLastName(String value) {
        String old = getLastName();
        lastName.setValue(value);
        firePropertyChange("lastName", old, lastName);
    }

}
Generally speaking to use a specification object you set it in a browser, then you can fill its properties with the informations it needs to do the filtering.
Every time the specification broadcast a PropertyChange event the browser will intercept it and will update its content with the entities that satisfies the specification.
Here we extended a ConjunctionSpecification so all the single property specifications must be true to satisfy the specification, but only if a value was set for it. If a null value is set for a single property specification, the specification will be considered always satisfied.
You can find a lot of details about specifications in the DominATE User Guide .
To use this filter first we change the factory method of the browser:
public ListBrowser<Long, Person> createPersonBrowser() {
    ListBrowserImpl<Long, Person> browser = new ListBrowserImpl<Long, Person>(Person.repository());
    browser = ThreadLocalContext.newThreadLocalService(browser);
    browser.setSpecification(new PersonSpecification());
    return browser;
}
Then we add two text boxes to the browsing window that are bound to the filtering properties:
    .....
    <window title="Person Browser"
            border="normal"
            width="300px"
            apply="it.amattioli.guidate.containers.BackBeanComposer">

        <custom-attributes backBean="personBrowser"/>

        <toolbar>
            <toolbarbutton label="New Person"
                           apply="it.amattioli.example1.NewPersonBtnComposer"/>
        </toolbar>

        <hbox width="100%" widths="50%,50%">
            <textbox apply="it.amattioli.guidate.properties.TextPropertyComposer"
                     width="95%">
                <custom-attributes propertyName="specification.firstName"/>
            </textbox>
            <textbox apply="it.amattioli.guidate.properties.TextPropertyComposer"
                     width="95%">
                <custom-attributes propertyName="specification.lastName"/>
            </textbox>
        </hbox>

        <listbox rows="5" width="99%"
                 apply="it.amattioli.guidate.browsing.BrowserListboxComposer">
            <listhead>
    .....
When you enter some text in one of these textboxes the filter will fire a PropertyChange method causing the ListBrowser to refresh its content and so the listbox.
If a textbox is clean, a null value is set in the corresponding specification and, as described before, it will be ignored.
Here you can also see another way to specify the property name: with a custom attribute. TextPropertyComposer always look for a custom attribute called propertyName, if it can't find this attribute it will use the id of the component.
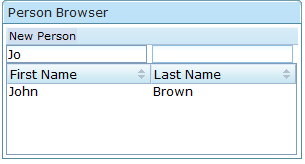
And this is the updated page:
Let's add some property more complex than a String! The first obvious non-string property for a person is the birthdate.
We have to put it in the Person class:
    .........

    private Date birthDate;

    @Past
    public Date getBirthDate() {
        return birthDate;
    }

    public void setBirthDate(Date birthDate) {
        this.birthDate = birthDate;
    }

    ........
Then in the database table:
alter table person add column birthdate date;
And in the hibernate mapping file:
    .......
    <property name="birthDate"/>
    .......
It is very straightforward to add it to the browser listbox:
<listbox rows="5" width="99%"
         apply="it.amattioli.guidate.browsing.BrowserListboxComposer">
        <listhead>
            <listheader label="First Name"
                        width="33%"
                        apply="it.amattioli.guidate.browsing.BrowserListheaderComposer"/>
            <listheader label="Last Name"
                        width="33%"
                        apply="it.amattioli.guidate.browsing.BrowserListheaderComposer"/>
            <listheader label="Birth Date"
                        width="34%"
                        apply="it.amattioli.guidate.browsing.BrowserListheaderComposer"/>
        </listhead>
        <listitem apply="it.amattioli.guidate.collections.PrototypeComposer">
            <listcell apply="it.amattioli.guidate.properties.LabelCellComposer">
                <custom-attributes propertyName="firstName"/>
            </listcell>
            <listcell apply="it.amattioli.guidate.properties.LabelCellComposer">
                <custom-attributes propertyName="lastName"/>
            </listcell>
            <listcell apply="it.amattioli.guidate.properties.LabelCellComposer">
                <custom-attributes propertyName="birthDate"/>
            </listcell>
        </listitem>
    </listbox>
</window>
Here the converter says to the list cell to show day information only (no hour/minutes).
The default conversion format for date attributes is the MEDIUM one of the user locale. If you want you can customize it using the converionFormat custom attribute:
<listcell apply="it.amattioli.guidate.properties.LabelCellComposer">
    <custom-attributes propertyName="birthDate" converionFormat="dd/MM/yyyy"/>
</listcell>
It is also very simple to modify the editor window:
<hbox widths="50%,50%">
    <label value="Birth Date:"/>
    <datebox id="birthDate"
             apply="it.amattioli.guidate.properties.DatePropertyComposer"/>
</hbox>
And the same with the custom tags:
<hbox widths="50%,50%">
    <label value="Birth Date:"/>
    <dateProperty propertyName="birthDate"/>
</hbox>
Notice that, as we annotated the birthdate property with @Past, we will get an error if we try to insert a future date.
Adding a birthdate filter to the browser is interesting. We will make use of classes contained in the Encapsulate subproject, so add it to your classpath.
We have to modify the PersonSpecification so to handle the new property:
    private DateSpecification<Person> birthdate = DateSpecification.newInstance("birthDate");

    public PersonSpecification() {
        addSpecification(firstName);
        addSpecification(lastName);
        addSpecification(birthdate);
    }

    public TimeInterval getBirthdate() {
        return birthdate.getValue();
    }

    public void setBirthdate(TimeInterval birthdate) {
        TimeInterval old = getBirthdate();
        this.birthdate.setValue(birthdate);
        firePropertyChange("birthdate", old, birthdate);
    }
The birthdate filter class is TimeInterval, an EncapsulATE interface that defines an interval between two instants in time. This because we are going to serach for birthdates that are between two dates. This is exactly the behaviour of the DateSpecification class. Pass it a TimeInterval and it will create a query for the date inside this interval.
Then the only thing we have to do is to add an appropriate textbox to the browser page:
<textbox apply="it.amattioli.guidate.properties.TimeIntervalPropertyComposer"
         width="95%">
    <custom-attributes propertyName="specification.birthdate"/>
</textbox>
If you prefer custom tags it is even simpler:
<timeIntervalProperty propertyName="specification.birthdate" width="95%" />
Why only one textbox if we need a time interval? Because in this textbox you can enter:
Unfortunately it is not i18n compliant yet, it supports "dd/MM/yyyy" format only. So you can enter, for example:
The real work is done by the TimeIntervalFormat class, if you need you can use it yourself to format/parse a TimeInterval. Refer to Encapsulate javadoc documentation for more informations.
The birthdate can be useful to show how to add a derived property. We can add a getAge() method to our Person class:
public void setBirthDate(Date birthDate) {
    this.birthDate = birthDate;
    this.firePropertyChange("age",null,getAge());
}

public Integer getAge() {
    if (getBirthDate() == null) {
        return null;
    }
    Calendar cal = Calendar.getInstance();
    cal.setTime(new Date());
    int thisYear = cal.get(Calendar.YEAR);
    cal.setTime(getBirthDate());
    int birthYear = cal.get(Calendar.YEAR);
    return thisYear - birthYear;
}
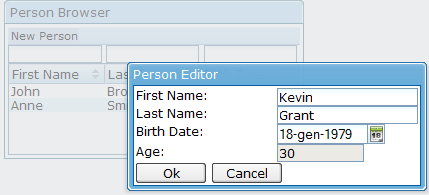
We modified the setBirthDate() method too. In this way, every time the birtDate change, we broadcast an event that informs that the age is changed. If we add to personEditor.zul a readonly textbox bound to the age property this will be refreshed every time the user enter a new value in the birthdate box.
This is effective in simple cases like this where we have only one derived property. But when a property modification triggers a lot of other derived property or a single derived property depends on a lot of other property, firing the derived property change event when the deriving property change could become a nightmare.
In more complex cases we can use the @Derived annotation:
public void setBirthDate(Date birthDate) {
    Date old = this.birthDate;
    this.birthDate = birthDate;
    this.firePropertyChange("birthDate", old, birthDate);
}

@Derived(dependsOn="birthDate")
public Integer getAge() {
    if (getBirthDate() == null) {
Here we fired only its own property change in the setBirthDate method. Having annotated the age accessor with @Derived(dependsOn="birthDate"), every time a birthDate property change event is fired, an age property change event is fired too.
Properties can depends on more than one property with a syntax like this:
@Derived(dependsOn={"property1","property2","property3"})
and cascading dependencies is supported, so propertyC can dependends on propertyB that depends on propertyA.
<hbox widths="50%,50%">
    <label value="Age:"/>
    <intbox id="age"
            apply="it.amattioli.guidate.properties.IntPropertyComposer"
            readonly="true"/>
</hbox>
Obviously there is a custom tags version:
<hbox widths="50%,50%">
    <label value="Age:"/>
    <intProperty propertyName="age" readonly="true"/>
</hbox>
A person gender can be easily modeled using an enum:
package it.amattioli.example1;

public enum Gender {
        MALE,
        FEMALE;
}
if we add a gender property to the Person class we can map it using a Hibernate user type. DominATE comes with a standard user type for enums parametrized with the enum class. In our mapping we can define:
<typedef name="gender" class="it.amattioli.dominate.hibernate.types.EnumUserType">
    <param name="enumClass">it.amattioli.example1.Gender</param>
</typedef>
Look at the Hibernate documentation for informations about type definition.
This user type persists an enum property in a VARCHAR column of your database using the enumerated objects names, so add a "gender" VARCHAR column to your person table and add the following to Person.hbm.xml:
<property name="gender" type="gender"/>
If you already have some rows in your person table update them.
Adding a cell to the listbrowser box is as simple as the date cell:
    <listcell apply="it.amattioli.guidate.properties.LabelCellComposer">
            <custom-attributes propertyName="gender"/>
    </listcell>
EnumConverter, the default converter for enumerations, having no other hint on how to convert the enum objects to strings, will use the enum objects names, but we can do better.
The simplest thing to do is to use the ZK i3-label.properties adding two rows like the following:
  it.amattioli.example1.Gender.MALE = Male
  it.amattioli.example1.Gender.FEMALE = Female
But this limits the full reuse of your Gender class. If you want to use it in another application you have to reproduce this rows in its i3-label.properties file (or something else if it's not a ZK application).
If you think this can be an issue you can use another approach.
Let the Gender class implement the Described interface:
package it.amattioli.example1;

import java.util.ResourceBundle;

import it.amattioli.dominate.Described;

public enum Gender implements Described {
    MALE,
    FEMALE;

    private static final ResourceBundle DESCRIPTIONS = ResourceBundle.getBundle("it.amattioli.example1.GenderDescriptions");

    @Override
    public String getDescription() {
        return DESCRIPTIONS.getString(this.name());
    }
}
and add a GenderDescriptions.properties file containing
MALE = Male
FEMALE = Female
The EnumConverter will recognize that Gender implements ths Described property and will use its getDescription() method to convert the object to a String.
Now, if you want, you can put the Gender class and its property file in a jar and reuse it in every JavATE appplication.
To let the user choose the person gender, in the personEditor.zul we can add
<hbox widths="50%,50%">
    <label value="Gender:"/>
    <listbox id="gender"
             mold="select"
             apply="it.amattioli.guidate.properties.PropertyValuesComposer"/>
</hbox>
or you can use custom tags:
<hbox widths="50%,50%">
    <label value="Gender:"/>
    <listProperty propertyName="gender" mold="select"/>
</hbox>
The PropertyValuesComposer will populate the listbox with the enum objects using EnumConverter to get their labels. The initially selected item will be obtained from the command and each time the user select a different item the command will be updated.
Notice that the first item in the listbox is an empty one. This is because the gender property is nullable so the user is able to choose a null value for it. If we annotate the gender property with @NotNull the empty item will disappear but we have to initialize the property with a not-null value too, otherwise the listbox will not be able to correctly initialize itself.
And what about filtering? Obviously we have to change the PersonSpecification class:
    ........
    private MultipleEnumSpecification<Person, Gender> genders = MultipleEnumSpecification.newInstance("gender", Gender.class);

    public PersonSpecification() {
        addSpecification(firstName);
        addSpecification(lastName);
        addSpecification(birthdate);
        addSpecification(genders);
    }

    public Collection<Gender> getGenders() {
        return genders.getValue();
    }

    public void setGenders(Collection<Gender> genders) {
        Collection<Gender> old = getGenders();
        this.genders.setValue(genders);
        firePropertyChange("genders", old, genders);
    }
    ........
Using a MultipleEnumSpecification class we can use a collection of genders to filter for multiple values.
When we add the appropriate listbox to personBrowser.zul
<listbox apply="it.amattioli.guidate.properties.PropertyValuesComposer"
         width="95%"
         checkmark="true">
    <custom-attributes propertyName="filter.genders"/>
</listbox>
the PropertyValueComposer will recognize that the associated property is a collection and will set the "multiple" attribute of the listbox to true. So the user will be able to choose more than one value on the listbox. Any time the user will select/deselect a value the browser will be refreshed accordingly.
A Collection property can be useful not only in a filter. Tho show this we will add a Collection of skills to the Person class.
private Collection<Skill> skills = new HashSet<Skill>();

public Collection<Skill> getSkills() {
    return skills;
}

public void setSkills(Collection<Skill> skills) {
    this.skills.clear();
    this.skills.addAll(skills);
}
This collection can be mapped on a separate table
<bag name="skills" table="person_skills">
    <key column="person_id"/>
    <element column="skill" type="skill"/>
</bag>
The SQL needed to create the person_skills table can be like the following:
create table person_skills (
    person_id integer(10),
    skill varchar(20)
)
To edit this property we only need to add this listbox to the personEditor.zul file
<hbox widths="50%,50%">
    <label value="Skills:"/>
    <listbox id="skills"
             apply="it.amattioli.guidate.properties.PropertyValuesComposer"
             rows="4"
             checkmark="true" />
</hbox>
Show how to do the same thing using a double list and drag and drop
It is very difficult to show a list of skills in a listbox column, so we need another way to show informations about person objects. We will create a sidebox that shows informations about the person currently selected in the list.
We will put this box in a separate zul file that we'll include in personBrowser.zul. Let call this new file personDetail.zul
        <window id="personDetail"
                border="none"
                width="99%"
                apply="it.amattioli.guidate.containers.BackBeanComposer">

            <custom-attributes backBean="${arg.objectBrowser}"/>

                <hbox width="100%" widths="25%,25%,25%,25%">
                        <label value="First Name:"/>
                        <label apply="it.amattioli.guidate.properties.LabelPropertyComposer">
                                <custom-attributes propertyName="firstName"/>
                        </label>
                        <label value="Last Name:"/>
                        <label apply="it.amattioli.guidate.properties.LabelPropertyComposer">
                                <custom-attributes propertyName="lastName"/>
                        </label>
                </hbox>

                <hbox width="100%" widths="25%,25%,25%,25%">
                        <label value="Birth Date:"/>
                        <label apply="it.amattioli.guidate.properties.LabelPropertyComposer">
                                <custom-attributes propertyName="birthDate"/>
                        </label>
                        <label value="Age:"/>
                        <label apply="it.amattioli.guidate.properties.LabelPropertyComposer">
                                <custom-attributes propertyName="age"/>
                        </label>
                </hbox>

                <hbox width="100%" widths="25%,25%,25%,25%">
                        <label value="Gender:"/>
                        <label apply="it.amattioli.guidate.properties.LabelPropertyComposer">
                                <custom-attributes propertyName="gender"/>
                        </label>
                        <label value="Skills:"/>
                        <listbox apply="it.amattioli.guidate.properties.CollectionPropertyComposer"
                                 rows="4">
                                <custom-attributes propertyName="skills"/>
                        </listbox>
                </hbox>

        </window>
The custom tags version is obviously more compact:
        <window id="personDetail"
                border="none"
                width="99%"
                apply="it.amattioli.guidate.containers.BackBeanComposer">

            <custom-attributes backBean="${arg.objectBrowser}"/>

                <hbox width="100%" widths="25%,25%,25%,25%">
                        <label value="First Name:"/>
                        <propertyValue propertyName="firstName"/>
                        <label value="Last Name:"/>
                        <propertyValue propertyName="lastName"/>
                </hbox>

                <hbox width="100%" widths="25%,25%,25%,25%">
                        <label value="Birth Date:"/>
                        <propertyValue propertyName="birthDate"/>
                        <label value="Age:"/>
                        <propertyValue propertyName="age"/>
                </hbox>

                <hbox width="100%" widths="25%,25%,25%,25%">
                        <label value="Gender:"/>
                        <propertyValue propertyName="gender"/>
                        <label value="Skills:"/>
                        <propertyGrid propertyName="skills"/>
                </hbox>

        </window>
The back bean of the detail window will be an ObjectBrowser, an object that is able to handle a single object and navigate through its details.
We can retrieve such an object from the ListBrowser using the getSelectedObjectBrowser() method. Doing so the ObjectBrowser will be linked to the ListBrowser and every time we select a person in the list the ObjectBrowser will be refreshed consequently.
To add this box to the personDetail page, define a ZK custom component
<?component name="personDetail" macroURI="personDetail.zul"?>
and then recall it inside the page passing the object browser as an argument
<personDetail objectBrowser="${personBrowserWindow.backBean.selectedObjectBrowser}"/>
Adding the birthplace property to the Person class we will learn how to handle many-to-one entity relationships.
We will model a town as a separate entity, the we will add to Person a relationship to Town called birthTown.
The first thing to do is to write the Town class:
public class Town extends EntityImpl implements Described {
    private String description;

    public String getDescription() {
        return description;
    }

    public void setDescription(String description) {
        this.description = description;
    }

    public static Repository<Long, Town> repository() {
        return RepositoryRegistry.instance().getRepository(Town.class);
    }
}
the town database table:
create table town (
    id integer(10) auto_increment primary key,
    version integer(10),
    description varchar(100)
)
and its mapping file:
<hibernate-mapping default-access="field" package="it.amattioli.example1">

  <class name="Town" table="town">

    <id name="id" type="java.lang.Long">
      <generator class="native"/>
    </id>

    <version name="version"
             type="java.lang.Long"/>

    <property name="description"/>

  </class>

</hibernate-mapping>
We implemented the Described interface so the user interface knows that it has to call the getDescription() method to have a String representation of the town.
Then we add the relationship to Person, in the class:
private Town birthTown;

public Town getBirthTown() {
    return birthTown;
}

public void setBirthTown(Town birthTown) {
    this.birthTown = birthTown;
}
on the database:
alter table person add column birthtown_id integer(10);
and in the Hibernate mapping file
<many-to-one name="birthTown" column="birthtown_id"/>
To let the user choose the birthplace during person creation we simply add the following to personEditor.zul
<hbox widths="50%,50%">
    <label value="Birth town:"/>
    <listbox id="birthTown"
             apply="it.amattioli.guidate.properties.PropertyValuesComposer"
             mold="select"/>
</hbox>
You can notice that there's no real difference from what we did for the gender enumeration. That's because PropertyValuseComposer recognizes that this is not an enumeration but an entity and it will use the appropriate repository to retrieve all the towns from the database and show them in the listbox.
To add the birthplace in the person detail box we can use a label:
<label value="Birth town:"/>
<label apply="it.amattioli.guidate.properties.LabelPropertyComposer">
    <custom-attributes propertyName="birthTown"/>
</label>
Or the propertyValue custom tag:
<label value="Birth town:"/>
<propertyValue propertyName="birthTown"/>
We are not going to add a filter on the birthplace but you can do it yourself. Follow the same way we did for the gender property but use MultipleEntityFilter instead of MultipleEnumFilter.
We put the towns in the database because we want to be able to edit them.
We can do it as we did with persons but for very simple objects like Town probably it is better to give the user the possibility to edit them in a single grid.
It is not difficult to implement such an editor extending the RepositoryEditor class.
The minimal form is the following:
public class TownEditor extends RepositoryEditor<Long, Town> {

    public TownEditor() {
        super(Town.repository());
    }

    @Override
    protected Town createObject() {
        return new Town();
        }

    @Override
    protected boolean toBePersisted(Town entity) {
        return !StringUtils.isBlank(entity.getDescription());
    }

}
We overrided two methods: createObject() and toBePersisted().
The first is responsible of the creation of a new Town object every time a new row is requested by the user while the second will check if the row has to be persisted when the command is executed. Here we simply check that the description of the town is not blank. If the user leave the description blank the row will be skipped.
Obviously we need to add a factory method in the service factory:
public TownEditor createTownEditor() {
    TownEditor editor = new TownEditor();
    editor = TransactionalCommandContext.newTransaction(editor);
    return editor;
}
an we need a zul page to interact with the user:
<zk>

    <window id="townEditorWindow"
            title="towns"
            border="normal"
            width="250px"
            apply="it.amattioli.guidate.containers.CommandComposer, it.amattioli.guidate.containers.ValidatingComposer">

        <custom-attributes backBean="townEditor"/>

        <toolbar>
            <toolbarbutton label="Add"     width="70px" apply="it.amattioli.guidate.editing.AddRowComposer"/>
            <toolbarbutton label="Remove"  width="70px" apply="it.amattioli.guidate.editing.DeleteRowComposer"/>
        </toolbar>

        <editorListbox id="exampleList" rows="5" width="99%">
            <listitemPrototype>
                <listcell>
                    <textProperty width="79%" propertyName="description"/>
                </listcell>
            </listitemPrototype>
        </editorListbox>

        <hbox>
            <button label="Ok"     width="70px" forward="onDoCommand"/>
            <button label="Cancel" width="70px" forward="onCancelCommand"/>
        </hbox>

    </window>

</zk>
Here we have a toolbar with add and remove buttons and a listbox that contains a row for each town.
This editor works perfectly eccept in one case: if we used a town as the birthplace of a person and we try to remove it we will get an error due to the foreign key constraint of the database.
To solve this problem we can override another method in the TownEditor:
    @Override
    public boolean canDeleteRow() {
        return super.canDeleteRow() && getSelectedObject().getId() == null;
    }
Here we are simply saying that an object can be deleted only if it has never been persisted on the database. Obviously we can do more complex checks.
The RepositoryEditor supports validation too, for example, if we want to check that a town name contains only letters we can annotate the town description property:
public class Town extends EntityImpl implements Described {
    private String description;

    @Pattern(regex="[a-zA-Z]*")
    public String getDescription() {
        return description;
    }

        ...........
