With JavATE 0.4 a new subproject has been released, called WorkstATE. It is an implementation of State Charts compatible with UML and configurable both in Java code and XML. And the Java code configuration open up a lot of possibilities about configuration, for example you could read the configuration from DB tables or you could write your own DSL in a JVM compatible language like JRuby or Scala.
Here is a set of examples of the WorkstATE features. It covers, if not all, the most important characteristics of the project.
Let start with a very basic example: an initial state with a transition to a single simple state.
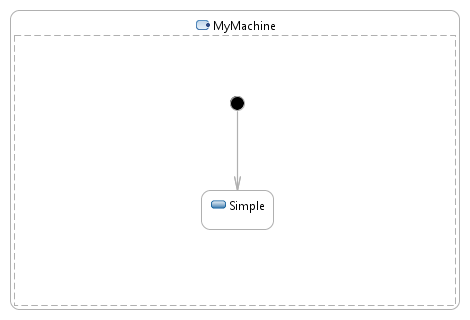
We will see how to configure such a state machine and we will check that after creating the state machine it will be in this state.
To configure the state machine by code, the first thing to do is to create a class that implements the Configuration interface. The read() method will do the magic:
public class ExampleConfiguration implements Configuration {
    private String id;

    public ExampleConfiguration(String id) {
        this.id = id;
    }

    public String getId() {
        return id;
    }

    public void setId(String id) {
        this.id = id;
    }

    public void setSource(String source) {
        // Nothing to do
    }

    public MetaMachine read(String name) {
        ConfigBuilder builder = new ConfigBuilder(this, id);
        builder.newState(StateType.MACHINE, "root", "M0");
            builder.newState(StateType.INITIAL, null, "I1");
            builder.endState();
            builder.newState(StateType.SIMPLE, "Simple", "S1");
            builder.endState();
        builder.endState();
        builder.newExternalTransition(null, "I1", "S1");
        builder.endTransition();
        return builder.getResult();
    }

}
To simplify the configuration we use a builder class called ConfigurationBuilder.
The first thing to do is to create the state machine on its own. As a state machine is a kind of state we use the newState() method, passing StateType.MACHINE as the state type. The second parameter of newState() is the state descriptive name (also called the state tag), while the third parameter is an identifier that can be used during the configuration to reference the state.
The state machine definition will be closed by a corresponding call to endState().
Between these two calls we define the initial state and the single simple state we can see in the state diagram.
Once we have the states we can define the transitions between them. Here we have only one transition between the initial state and the simple state. To define it we call newExternalTransition().
The first parameter is the event that trigger this transitions, but transitions starting from the initial state are automatically triggered without an event, so we pass null.
The other two parameters are the identifiers of the starting and ending state.
Now the configuration is ready to be used. We write a simple class with a main() method or, if you prefer, a jUnit test:
public class Main {

    public static void main(String[] args) throws Exception {
        Configuration c = new ExampleConfiguration("MyMachine");
        Registry.instance().register(c);
        Machine machine = Registry.instance().newMachine("MyMachine");
        SimpleState currentState = (SimpleState)machine.getCurrentState();
        System.out.println(currentState.getTag());
    }

}
We create an instance of the newly created configuration class and we register it with the state machines registry. Then we use the registry to get an instance of a machine that follows this configuration.
When the machine is created it enters its initial state and follows the transition starting from it and ending to the "Simple" state. So when we get the machine current state and print its tag we get:
Simple
If you prefer you can configure the state machine using XML.
Some of you will complain about XML, but there is a reason for doing it. We will see that the complexity of the configuration will soon explode. Fortunately we can use UML to draw state diagrams and most UML tools allow us to export th diagrams in XMI format, an XML dialect. XMI is different from the Workstate XML configuration but it is very simple to write an XSL transformation that converts from XMI to Workstate. And you can automate it in your build system, ANT or Maven.
An XML file that configures a state machine identical to the one we configured previously is the following:
<?xml version="1.0" encoding="UTF-8"?>
<Machine tag="root" id="M0">
    <States>
        <InitialState id="I1" />
        <SimpleState tag="Simple" id="S1" />
    </States>
    <Transitions>
        <ExternalTransition start="I1" end="S1" />
    </Transitions>
</Machine>
Put it in your classpath and use it with a code similar to this:
public static void main(String[] args) throws Exception {
    Configuration c = new XmlConfiguration("it/amattioli/wsExample1xml/example1.xml", "MyMachine");
    Registry.instance().register(c);
    Machine machine = Registry.instance().newMachine("MyMachine");
    SimpleState currentState = (SimpleState)machine.getCurrentState();
    System.out.println(currentState.getTag());
}
Now we will try with a state machine a little bit more complex than the previous one.
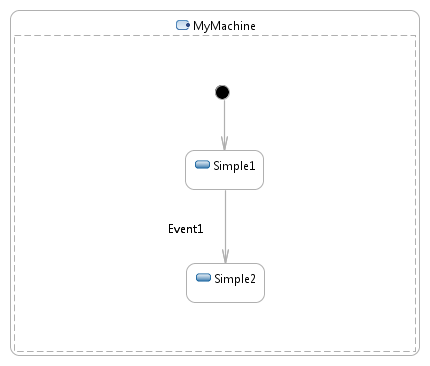
In this new machine we have a transition triggered by an event and the configuration will reflect this fact.
public MetaMachine read() {
    ConfigBuilder builder = new ConfigBuilder(this, id);
    builder.newState(StateType.MACHINE, "root", "M0");
        builder.newState(StateType.INITIAL, null, "I1");
        builder.endState();
        builder.newState(StateType.SIMPLE, "Simple1", "S1");
        builder.endState();
        builder.newState(StateType.SIMPLE, "Simple2", "S2");
        builder.endState();
    builder.endState();
    builder.newEvent("Event1", "E1");
    builder.endEvent();
    builder.newExternalTransition(null, "I1", "S1");
    builder.endTransition();
    builder.newExternalTransition("E1", "S1", "S2");
    builder.endTransition();
    return builder.getResult();
}
Events must be configured aoutside transitions because they can be reused. More than one transition ca be triggered by the same event.
In the Main class we will trigger the transition sending an event to the machine:
public static void main(String[] args) throws Exception {
    Configuration c = new ExampleConfiguration("MyMachine");
    Registry.instance().register(c);
    Machine machine = Registry.instance().newMachine("MyMachine");
    machine.postEvent("Event1");
    machine.processEvents();
    SimpleState currentState = (SimpleState)machine.getCurrentState();
    System.out.println(currentState.getTag());
}
The postEvent() method takes as parameter the tag of the event we are sending.
We can post more than one event to the machine. They will be queued until the processEvent() method is called.
The corresponding xml configuration for this machine is:
<?xml version="1.0" encoding="UTF-8"?>
<Machine tag="root" id="M0">
    <States>
        <InitialState id="I1" />
        <SimpleState tag="Simple1" id="S1" />
        <SimpleState tag="Simple2" id="S2" />
    </States>
    <Events>
        <Event tag="Event1" id="E1"/>
    </Events>
    <Transitions>
        <ExternalTransition start="I1" end="S1" />
        <ExternalTransition start="S1" end="S2" event="E1"/>
    </Transitions>
</Machine>
Try yourself to modify the Main class so to use this configuration in place of the Java coded one.
It is possible to pass parameters to the events. These parameters can be used for a lot of purposes but the most common case is to use them in guard expressions that allows to choose between multiple transitions triggered by the same event.
The machine we are going to use can be represented by the the following diagram:
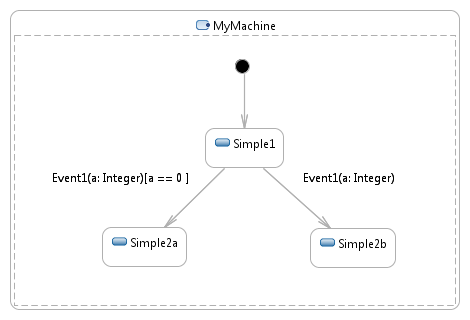
Here you can see two transitions exiting from "State1", both triggered by "Event1", but one has a guard expression that says that parameter "a" must be 0 to be followed. As it has no guard, the other transition is followed if the other transition guard is not satisfied.
To configure such a state machine we use the following code. The meaning should be clear.
public MetaMachine read() {
    ConfigBuilder builder = new ConfigBuilder(this, id);
    builder.newState(StateType.MACHINE, "root", "M0");
        builder.newState(StateType.INITIAL, null, "I1");
        builder.endState();
        builder.newState(StateType.SIMPLE, "Simple1", "S1");
        builder.endState();
        builder.newState(StateType.SIMPLE, "Simple2a", "S2a");
        builder.endState();
        builder.newState(StateType.SIMPLE, "Simple2b", "S2b");
        builder.endState();
    builder.endState();
    builder.newEvent("Event1", "E1");
        builder.newAttribute("a", "Integer", "");
        builder.endAttribute();
    builder.endEvent();
    builder.newExternalTransition(null, "I1", "S1");
    builder.endTransition();
    builder.newExternalTransition("E1", "S1", "S2a");
        builder.setGuard("{ a.equals(new Integer(0)) }");
    builder.endTransition();
    builder.newExternalTransition("E1", "S1", "S2b");
    builder.endTransition();
    return builder.getResult();
}
Guard expressions can be specified in two ways. You can pass a BeanShell expression between curly braces or you can specify the full qualified name of a class that implements the Guard interface. Having a very simple expression here we used BeanShell.
The equivalent xml configuration is the following:
<?xml version="1.0" encoding="UTF-8"?>
<Machine tag="root" id="M0">
    <States>
        <InitialState id="I1" />
        <SimpleState tag="Simple1" id="S1" />
        <SimpleState tag="Simple2a" id="S2a" />
        <SimpleState tag="Simple2b" id="S2b" />
    </States>
    <Events>
        <Event tag="Event1" id="E1">
            <Attribute tag="a" class="Integer"/>
        </Event>
    </Events>
    <Transitions>
        <ExternalTransition start="I1" end="S1" />
        <ExternalTransition start="S1" end="S2a" event="E1">
            <Guard>{ a.equals(new Integer(0)) }</Guard>
        </ExternalTransition>
        <ExternalTransition start="S1" end="S2b" event="E1"/>
    </Transitions>
</Machine>
We can now use this machine. Obviously when we post the "Event1" event we need to specify a value for the "a" parameter:
public static void main(String[] args) throws Exception {
    Configuration c = new ExampleConfiguration("MyMachine");
    Registry.instance().register(c);
    Machine machine = Registry.instance().newMachine("MyMachine");
    Map<String,Object> params = new HashMap<String,Object>() {{
        put("a", new Integer(0));
    }};
    machine.postEvent("Event1", params);
    machine.processEvents();
    SimpleState currentState = (SimpleState)machine.getCurrentState();
    System.out.println(currentState.getTag());
}
Having passed 0 as the parameter value the machine will end in State2a. Try to change the parameter value and look at the result!
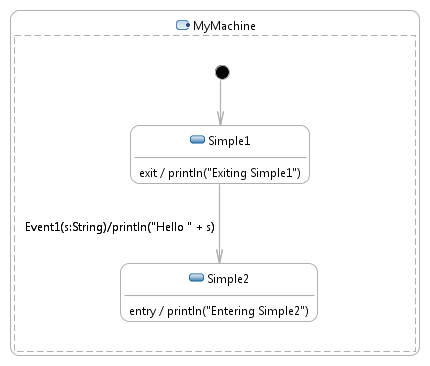
During state transition the machine can execute actions. There are three types of actions: entry actions, transition actions and exit actions.
Entry and exit actions are associated to states and are executed when the machine respectively enter or exit that state.
Transition actions are associated to transitions and are executed while the transition is being performed.
In our example we will implement a state machine like the following:
The Java code configuration for such a state machine is:
public MetaMachine read() {
    ConfigBuilder builder = new ConfigBuilder(this, id);
    builder.newState(StateType.MACHINE, "root", "M0");
        builder.newState(StateType.INITIAL, null, "I1");
        builder.endState();
        builder.newState(StateType.SIMPLE, "Simple1", "S1");
            builder.setExitAction("{System.out.println(\"Exiting Simple1\")}");
        builder.endState();
        builder.newState(StateType.SIMPLE, "Simple2", "S2");
            builder.setEntryAction("{System.out.println(\"Entering Simple2\")}");
        builder.endState();
    builder.endState();
    builder.newEvent("Event1", "E1");
        builder.newAttribute("s", "String", "");
        builder.endAttribute();
    builder.endEvent();
    builder.newExternalTransition(null, "I1", "S1");
    builder.endTransition();
    builder.newExternalTransition("E1", "S1", "S2");
        builder.setAction("{System.out.println(\"Hello \" + s)}");
    builder.endTransition();
    return builder.getResult();
}
Like for guards, actions can be specified using a BeanShell script or using a class that implements the StateAction interface (for entry and exit actions) or the TransitionAction interface (for transition actions).
The equivalent xml configuration file is:
<?xml version="1.0" encoding="UTF-8"?>
<Machine tag="root" id="M0">
    <States>
        <InitialState id="I1" />
        <SimpleState tag="Simple1" id="S1">
            <ExitAction>{System.out.println("Exiting Simple1")}</ExitAction>
        </SimpleState>
        <SimpleState tag="Simple2" id="S2">
            <EntryAction>{System.out.println("Entering Simple2")}</EntryAction>
        </SimpleState>
    </States>
    <Events>
        <Event tag="Event1" id="E1">
            <Attribute tag="s" class="String"/>
        </Event>
    </Events>
    <Transitions>
        <ExternalTransition start="I1" end="S1" />
        <ExternalTransition start="S1" end="S2" event="E1">
            <Action>{System.out.println("Hello " + s)}</Action>
        </ExternalTransition>
    </Transitions>
</Machine>
When we send an event to this machine we can see the action executed:
public static void main(String[] args) throws Exception {
    Configuration c = new ExampleConfiguration("MyMachine");
    Registry.instance().register(c);
    Machine machine = Registry.instance().newMachine("MyMachine");
    Map<String,Object> params = new HashMap<String,Object>() {{
        put("s", "Andrea");
    }};
    machine.postEvent("Event1", params);
    machine.processEvents();
}
The result is:
Exiting Simple1
Hello Andrea
Entering Simple2
In the previous examples we always used simple states but state can be composite and can have sub-states.
There are two possible kinds of composite states: sequential states and concurrent states.
In a sequential state the machine, at each time, can be in only one of the possible sub-states. We can see it in the following diagarm:
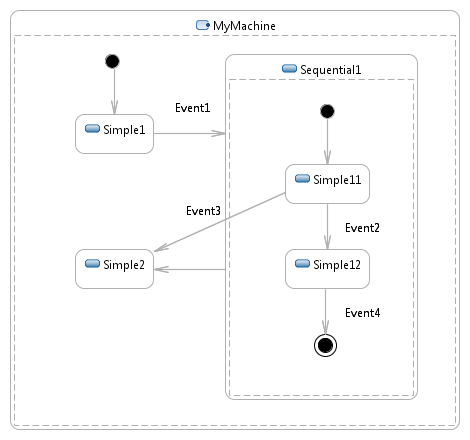
When the state machine enter the "Sequential1" state it will follow its initial transition and it will enter the "Simple11" state. Then, if an "Event2" event arrives, it will arrive in the "Simple12" state. Otherwise, if an "Event3" event is sent to the machine, it will exit both "Simple12" and "Sequential1" to enter "Simple2".
Suppose the state machine is in "Simple12". If an "Event4" event is sent to the machine, it will reach the end state of "Sequential1". This means that the state machine will exit "Sequential1" following a transition without a triggering event and so it will end in the "Simple2" state.
To try this we need to configure the state machine. This is the Java way of doing it:
    public MetaMachine read() {
        ConfigBuilder builder = new ConfigBuilder(this, id);
        builder.newState(StateType.MACHINE, "root", "M0");
            builder.newState(StateType.INITIAL, null, "I1");
            builder.endState();
            builder.newState(StateType.SIMPLE, "Simple1", "S1");
                builder.setEntryAction("{System.out.println(\"Entering Simple1\")}");
            builder.endState();
            builder.newState(StateType.SEQUENTIAL, "Sequential1", "SQ1");
                builder.newState(StateType.INITIAL, null, "SQ1I");
                builder.endState();
                builder.newState(StateType.SIMPLE, "Simple11", "SQ11");
                    builder.setEntryAction("{System.out.println(\"Entering Simple11\")}");
                builder.endState();
                builder.newState(StateType.SIMPLE, "Simple12", "SQ12");
                    builder.setEntryAction("{System.out.println(\"Entering Simple12\")}");
                builder.endState();
                builder.newState(StateType.FINAL, null, "SQ1F");
                builder.endState();
            builder.endState();
            builder.newState(StateType.SIMPLE, "Simple2", "S2");
                builder.setEntryAction("{System.out.println(\"Entering Simple2\")}");
            builder.endState();
        builder.endState();
        builder.newEvent("Event1", "E1");
        builder.endEvent();
        builder.newEvent("Event2", "E2");
        builder.endEvent();
        builder.newEvent("Event3", "E3");
        builder.endEvent();
        builder.newEvent("Event4", "E4");
        builder.endEvent();
        builder.newExternalTransition(null, "I1", "S1");
        builder.endTransition();
        builder.newExternalTransition("E1", "S1", "SQ1");
        builder.endTransition();
        builder.newExternalTransition(null, "SQ1I", "SQ11");
        builder.endTransition();
        builder.newExternalTransition("E2", "SQ11", "SQ12");
        builder.endTransition();
        builder.newExternalTransition("E3", "SQ11", "S2");
        builder.endTransition();
        builder.newExternalTransition("E4", "SQ12", "SQ1F");
        builder.endTransition();
        builder.newExternalTransition(null, "SQ1", "S2");
        builder.endTransition();
        return builder.getResult();
    }
and this is the XML way:
<?xml version="1.0" encoding="UTF-8"?>
<Machine tag="root" id="M0">
    <States>
        <InitialState id="I1" />
        <SimpleState tag="Simple1" id="S1">
            <EntryAction>{System.out.println("Entering Simple1")}</EntryAction>
        </SimpleState>
        <SequentialState tag="Sequential1" id="SQ1">
            <InitialState id="SQ1I" />
            <SimpleState tag="Simple11" id="SQ11">
                <EntryAction>{System.out.println("Entering Simple11")}</EntryAction>
            </SimpleState>
            <SimpleState tag="Simple12" id="SQ12">
                <EntryAction>{System.out.println("Entering Simple12")}</EntryAction>
            </SimpleState>
            <FinalState id="SQ1F"/>
        </SequentialState>
        <SimpleState tag="Simple2" id="S2">
            <EntryAction>{System.out.println("Entering Simple2")}</EntryAction>
        </SimpleState>
    </States>
    <Events>
        <Event tag="Event1" id="E1"/>
        <Event tag="Event2" id="E2"/>
        <Event tag="Event3" id="E3"/>
        <Event tag="Event4" id="E4"/>
    </Events>
    <Transitions>
        <ExternalTransition start="I1"   end="S1" />
        <ExternalTransition start="S1"   end="SQ1"  event="E1"/>
        <ExternalTransition start="SQ1I" end="SQ11"/>
        <ExternalTransition start="SQ11" end="SQ12" event="E2"/>
        <ExternalTransition start="SQ11" end="S2"   event="E3"/>
        <ExternalTransition start="SQ12" end="SQ1F" event="E4"/>
        <ExternalTransition start="SQ1"  end="S2"/>
    </Transitions>
</Machine>
We can try to send events to this machine:
Configuration c = new ExampleConfiguration("MyMachine");
Registry.instance().register(c);
Machine machine = Registry.instance().newMachine("MyMachine");
machine.postEvent("Event1");
machine.postEvent("Event2");
machine.postEvent("Event4");
machine.processEvents();
We obtain:
Entering Simple1
Entering Simple11
Entering Simple12
Entering Simple2
that confirms our intial description.
When in a concurrent state, a state machine is, at the same time, in all its sub-states. Look at the example:
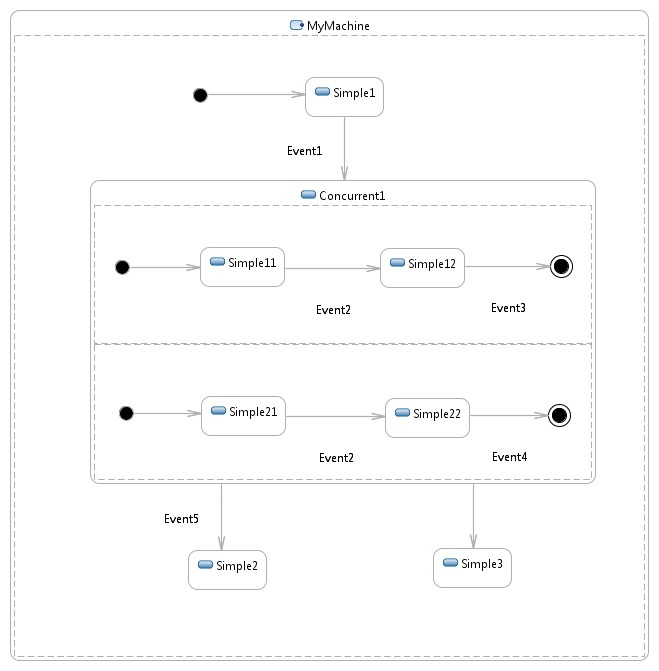
The "Concurrent1" state has two sub-states, called regions. Each region is composed of a sequential state that can receive events at the same time.
Let us configure the state machine before trying to use it:
public MetaMachine read() {
    ConfigBuilder builder = new ConfigBuilder(this, id);
    builder.newState(StateType.MACHINE, "root", "M0");
        builder.newState(StateType.INITIAL, null, "I1");
        builder.endState();
        builder.newState(StateType.SIMPLE, "Simple1", "S1");
            builder.setEntryAction("{System.out.println(\"Entering Simple1\")}");
        builder.endState();
        builder.newState(StateType.CONCURRENT, "Concurrent1", "CC1");
            builder.newState(StateType.SEQUENTIAL, "Region1", "RG1");
                builder.newState(StateType.INITIAL, null, "RG1I");
                builder.endState();
                builder.newState(StateType.SIMPLE, "Simple11", "RG11");
                    builder.setEntryAction("{System.out.println(\"Entering Simple11\")}");
                builder.endState();
                builder.newState(StateType.SIMPLE, "Simple12", "RG12");
                    builder.setEntryAction("{System.out.println(\"Entering Simple12\")}");
                builder.endState();
                builder.newState(StateType.FINAL, null, "RG1F");
                builder.endState();
            builder.endState();
            builder.newState(StateType.SEQUENTIAL, "Region2", "RG2");
                builder.newState(StateType.INITIAL, null, "RG2I");
                builder.endState();
                builder.newState(StateType.SIMPLE, "Simple21", "RG21");
                    builder.setEntryAction("{System.out.println(\"Entering Simple21\")}");
                builder.endState();
                builder.newState(StateType.SIMPLE, "Simple22", "RG22");
                    builder.setEntryAction("{System.out.println(\"Entering Simple22\")}");
                builder.endState();
                builder.newState(StateType.FINAL, null, "RG2F");
                builder.endState();
            builder.endState();
        builder.endState();
        builder.newState(StateType.SIMPLE, "Simple2", "S2");
            builder.setEntryAction("{System.out.println(\"Entering Simple2\")}");
        builder.endState();
        builder.newState(StateType.SIMPLE, "Simple3", "S3");
            builder.setEntryAction("{System.out.println(\"Entering Simple3\")}");
        builder.endState();
    builder.endState();
    builder.newEvent("Event1", "E1");
    builder.endEvent();
    builder.newEvent("Event2", "E2");
    builder.endEvent();
    builder.newEvent("Event3", "E3");
    builder.endEvent();
    builder.newEvent("Event4", "E4");
    builder.endEvent();
    builder.newEvent("Event5", "E5");
    builder.endEvent();
    builder.newExternalTransition(null, "I1", "S1");
    builder.endTransition();
    builder.newExternalTransition("E1", "S1", "CC1");
    builder.endTransition();
    builder.newExternalTransition(null, "RG1I", "RG11");
    builder.endTransition();
    builder.newExternalTransition("E2", "RG11", "RG12");
    builder.endTransition();
    builder.newExternalTransition("E3", "RG12", "RG1F");
    builder.endTransition();
    builder.newExternalTransition(null, "RG2I", "RG21");
    builder.endTransition();
    builder.newExternalTransition("E2", "RG21", "RG22");
    builder.endTransition();
    builder.newExternalTransition("E4", "RG22", "RG2F");
    builder.endTransition();
    builder.newExternalTransition("E5", "CC1", "S2");
    builder.endTransition();
    builder.newExternalTransition(null, "CC1", "S3");
    builder.endTransition();
    return builder.getResult();
}
The xml version is the following:
<Machine tag="root" id="M0">
    <States>
        <InitialState id="I1" />
        <SimpleState tag="Simple1" id="S1">
            <EntryAction>{System.out.println("Entering Simple1")}</EntryAction>
        </SimpleState>
        <ConcurrentState tag="Concurrent1" id="CC1">
            <SequentialState tag="Region1" id="RG1">
                <InitialState id="RG1I" />
                <SimpleState tag="Simple11" id="RG11">
                    <EntryAction>{System.out.println("Entering Simple11")}</EntryAction>
                </SimpleState>
                <SimpleState tag="Simple12" id="RG12">
                    <EntryAction>{System.out.println("Entering Simple12")}</EntryAction>
                </SimpleState>
                <FinalState id="RG1F"/>
            </SequentialState>
            <SequentialState tag="Region2" id="RG2">
                <InitialState id="RG2I" />
                <SimpleState tag="Simple21" id="RG21">
                    <EntryAction>{System.out.println("Entering Simple11")}</EntryAction>
                </SimpleState>
                <SimpleState tag="Simple22" id="RG22">
                    <EntryAction>{System.out.println("Entering Simple12")}</EntryAction>
                </SimpleState>
                <FinalState id="RG2F"/>
            </SequentialState>
        </ConcurrentState>
        <SimpleState tag="Simple2" id="S2">
            <EntryAction>{System.out.println("Entering Simple2")}</EntryAction>
        </SimpleState>
        <SimpleState tag="Simple3" id="S3">
            <EntryAction>{System.out.println("Entering Simple2")}</EntryAction>
        </SimpleState>
    </States>
    <Events>
        <Event tag="Event1" id="E1"/>
        <Event tag="Event2" id="E2"/>
        <Event tag="Event3" id="E3"/>
        <Event tag="Event4" id="E4"/>
        <Event tag="Event5" id="E5"/>
    </Events>
    <Transitions>
        <ExternalTransition            start="I1" end="S1" />
        <ExternalTransition event="E1" start="S1" end="CC1"/>
        <ExternalTransition            start="RG1I" end="RG11"/>
        <ExternalTransition event="E2" start="RG11" end="RG12"/>
        <ExternalTransition event="E3" start="RG12" end="RG1F"/>
        <ExternalTransition            start="RG2I" end="RG21"/>
        <ExternalTransition event="E2" start="RG21" end="RG22"/>
        <ExternalTransition event="E4" start="RG22" end="RG2F"/>
        <ExternalTransition event="E5" start="CC1" end="S2"/>
        <ExternalTransition            start="CC1" end="S3"/>
    </Transitions>
</Machine>
Sending "Event1" to this machine will make it enter both "Simple11" and "Simple21" states:
public static void main(String[] args) throws Exception {
    Configuration c = new ExampleConfiguration("MyMachine");
    Registry.instance().register(c);
    Machine machine = Registry.instance().newMachine("MyMachine");
    machine.postEvent("Event1");
    machine.processEvents();
}
So the output will be:
Entering Simple1
Entering Simple11
Entering Simple21
Now send "Event2" too and you will see that both regions will react and the output will be:
Entering Simple1
Entering Simple11
Entering Simple21
Entering Simple12
Entering Simple22
If you send "Event3" only the first region will have a triggered transition. This region is now terminated and will not receive any more events. But the second region is still alive.
Now send "Event4". The second region will reach its final state so all the regions are terminated and the machine will exit the concurrent state following the transition without trigger.
The final output is:
Entering Simple1
Entering Simple11
Entering Simple21
Entering Simple12
Entering Simple22
Entering Simple3
You can use WorkstATE to handle an entity workflow. Suppose, for example, you are developing an issue tracker application and your items (or issues, ticket, or whatever else you want) have a simple workflow with Open and Closed states and a Close event that trigger the transition from Open to Close.
This state machine can be configured using an ItemWorkflowConfiguration class with the following:
ConfigBuilder builder = new ConfigBuilder(this, id);
builder.newState(StateType.MACHINE, "root", "M0");
    builder.newState(StateType.INITIAL, null, "I1");
    builder.endState();
    builder.newState(StateType.SIMPLE, "Open", "S1");
    builder.endState();
    builder.newState(StateType.SIMPLE, "Closed", "S2");
    builder.endState();
builder.endState();
builder.newEvent("Close", "E1");
builder.endEvent();
builder.newExternalTransition(null, "I1", "S1");
builder.endTransition();
builder.newExternalTransition("E1", "S1", "S2");
builder.endTransition();
return builder.getResult();
It is very simple to write the Item class:
public class Item extends EntityImpl {
    public static void initWorkflow() {
        Configuration c = new ItemWorkflowConfiguration("ItemMachine");
        Registry.instance().register(c);
    }

    private String name;
    private Machine workflow = Registry.instance().newMachine("ItemMachine", this);

    public Item() throws Exception {

    }

    public String getName() {
        return name;
    }

    public void setName(String name) {
        this.name = name;
    }
}
The initWorkflow() static method must be called before using the class as it register the workflow configuration. It could be done in an anonymous static initializer but I prefer to make it explicit.
To perform the transition we can add a close() method:
public void close() throws WorkflowException {
    workflow.postEvent("Close");
    workflow.processEvents();
}
So we can write a Main class like this:
public static void main(String[] args) throws Exception {
    Item.initWorkflow();
    Item i = new Item();
    i.close();
}
We can even map our Item on a database table with Hibernate. In the database table we create a VARCHAR column to contain the Item state so we can use the MachineHibernateType Hibernate user type.
<hibernate-mapping package="it.amattioli.wsExample7">
    <class name="Item" table="ITEM">

        <id name="id" column="id" type="java.lang.Long">
            <generator class="increment"/>
        </id>

        <version name="version"
                 type="java.lang.Long"
                 unsaved-value="undefined" />

        <property name="name"/>

        <property name="workflow" access="field">
            <type name="it.amattioli.workstate.hibernate.MachineHibernateType">
                <param name="machineId">ItemMachine</param>
            </type>
        </property>

    </class>
</hibernate-mapping>
In the type declaration we must add the "machineId" parameter to set the id of the configuration that will be used. It must match the id we used during the configuration registration in the initWorkflow() method.
We have not accessor methods for the workflow attribute so we need to set access="field".
We can even add a repository() method to the Item class:
public static Repository<Long, Item> repository() {
    return RepositoryRegistry.instance().getRepository(Item.class);
}
Now we can write a transaction to put a machine in the database:
public static void main(String[] args) throws Exception {
    Item.initWorkflow();
    RepositoryRegistry.instance().setRepositoryFactoryClass(HibernateRepositoryFactory.class);
    HibernateSessionManager.setCfgResource("it/amattioli/wsExample7/hibernate.cfg.xml");

    Session session = new SessionManagerRegistry().currentSessionManager().getSession(Session.class);

    Transaction trn = session.beginTransaction();
    Item i = new Item();
    i.close();
    Item.repository().put(i);
    trn.commit();

    HibernateSessionManager.disconnectAll();
}
The first three rows are there for initialization purposes. In a real application you usually put it in some application initializer.
Then we retrieve a Hibernate session and start a transaction, we create and operate with an Item, then we save it in the repository and commit the transaction.
At least we disconnect the Hibernate session from the database.
If we query the database table in the workflow column we can see:
root[Close]
Generally speaking substates are encapsulated in square brackets while concurrent regions are separated by commas. If you are in Simple12 and Simple21 states of the previous chapter example you can see:
root[Concurrent1[Region1[Simple12],Region2[Simple21]]]
There is also the possibility to query Items by state using specifications:
public static void main(String[] args) throws Exception {
    Item.initWorkflow();
    SpecificationsConfig.addSpecificationConfig("/it/amattioli/workstate/specifications/specifications.properties");
    RepositoryRegistry.instance().setRepositoryFactoryClass(HibernateRepositoryFactory.class);
    HibernateSessionManager.setCfgResource("it/amattioli/wsExample7/hibernate.cfg.xml");

    Item i = Item.repository().get(1L);
    MachineSpecification<Item> spec = MachineSpecification.newInstance("workflow", "ItemMachine");
        spec.setStateName("Closed");
        System.out.println(Item.repository().list(spec));
}
Now there is one more configuration line. It is used to register the MachineSpecification before using it.
When we call the static newInstance() method on the MachineSpecification we have to pass the name of the attribute that contains the workflow and the configuration id (the same we used in the initWorkflow() method to register the configuration).
The we can use the setStateName() to set the tag of the state we are querying. In this case we are looking for all the items that are in the "Closed" state.
